Hair Tutorial
Rules of the game:
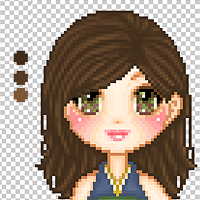
So here is the tutorial for how to doll hair, the Sayra way! First, before anything, I always start off with a palatte of three colors. These will be the only colors I will use for the duration of this tutorial.
Step one
Taking the middle color, your base color for the hair, I create a basic outline and shale of the hair. Hair shouldn't look like it was poured from a cake mold, so there are pieces hanging here and there. Also, if you tuck behind the ear, don't forget that there are natural sideburns. Even woman have them. But once you get the shape of your hair right, you are ready to move on to the next step.

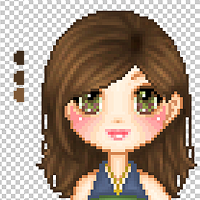
Step Two
Time to get started with the fun parts! SHADING! Now, I like to keep this neat and tidy, so I select the hair with the magic wand and then hit ctrl+H so that the select lines are gone and not imparing my judgement. Just don't forget you have that selected later. It can drive you nuts. Taking the darkest color and a 1% brush I select a central starting point. As you can see, there's an area of dark brown off center where all my lines start from. And from there, drawl your lines the way you think hair falls naturally. It totally isn't cheating if you using a visual aid to help you out. Once I am done with the strands, I like to do this next little bit to help with the depth shading that comes later. Keeping that same color, shade a bit where shadows would be, like under the hair and around the ear. Trust me, it helps later.

Step Three
I always love this part. Taking the lightest color and the same brush size, I go IN BETWEEN the previous lines from step two, but not messing with that central starting area. Sometimes, you can go over the dark lines with the lighter color. That's fine. If it doesn't look fo to you then go back with the darker color and fix the line and continue on. That's really all that there is to this step.
Step Four
Next is the smudge too. This is a delecate process, so I duplicate my layer and work on that layer from here on out. It is good to have the other layer under this layber because when you smudge, it can pull the pixels away from where they should be and look, well, awkward. The duplicating of the hair layer makies it look more clean. I usually use between a 3% and 5% brush with the strength on 25%. Starting at the central staring area everytime and smudge down the flow of the hair to the bottom. You usually only need to smudge one area once before moving on and it is ok if your brush overlaps a bit. For the bottom of the hair (under the head, there), I do the same thing, only staring at the top and going down, following the flow of the hair. Simple as that.

Step Five
Shadow times. Now when it comes to the dodge and burn tools, it's usually a fiddle til you find a setting that works kind of thing for me. I usually do this next part using the burn tool at a 3% brush set on midtones at a 45% exposure. I then fiddle in the area where I think shadows are needed most. The part of the hair (The central starting point), under the head and behind the ears, and sometimes in between certain strainds, just for extra depth.

Step Six
One last step and then we are done with the shading. And that is the final highlight. The shiny. This part is my all time favorite! Taking the dodge tool, I fiddle around unitl I find a pretty big sized brush, usually around 15% or higher and set it on highlights at around 20%. Then I draw on the hair in a semi-circle, the way the light would hit the top of your head normally. Sometimes I do this more than once, depending on the color of the hair and the look and feel of the doll. Then, for extra measure, add a bit to the tips and, for the most part, you are done!
Step Seven
Now here is where you can add little finishing touches. Recently, I started smuging the hair just a little on the forehead to that it wasn't to crip looking and also gave the illusion of a shadow. But make sure to diselect that layer first! But adding shadows to the skin, in whatever manor you want is a good way to bring this all together. Or you can add little clips or other cute hair assessories. Just have fun with it!
